How to Sew Your Own Underwear/Panties
This is a short tutorial on how to sew your own underwear or panties. Everything begins with your measurements to create the perfect fit, and you can customize everything. It is very easy to make these from an old 100% cotton T-shirt, but you can use any fabric you'd like.
Your first pair probably won't be perfect. It should be wearable, though, and that's the important thing. The leg openings can be the trickiest to get right, so don't be afraid to keep practicing!
Your first pair probably won't be perfect. It should be wearable, though, and that's the important thing. The leg openings can be the trickiest to get right, so don't be afraid to keep practicing!
MATERIALS
This is what you will need for this project. You can sub any fabric you'd like for the T-shirt. If your fabric is not 100% cotton (most T-shirts are), then you will need an additional piece of 100% cotton knit fabric, about a square foot, for the lining.
- T-shirt
- paper for pattern-making (printer paper taped together works, as does newspaper)
- measuring tape and ruler
- straight pins
- matching or coordinating thread
- a few yards of 1/4" elastic (if you plan to thread elastic through the hem of the shirt and use it as a top hem on the underwear, you will alost need 1/2" elastic for that)
MEASURING
Take measurements while wearing comfortable, plain underwear. You should be able to take all measurements on your own, but if you have trouble, enlist the help of a very trusted friend. Take the most accurate measurements possible to aid in getting a good fit in the end.
Also, at this time, take note of the stretch factor of your fabric. Cut a small sample piece (you can use a piece of a sleeve), measure it laying flat, and make note of this as the non-stretched measurement. Now, stretch it and measure again. You can pin it to an ironing board or foam board to help you with this. Make sure to stretch in the same direction as before. This is the stretched measurement. Subtract the non-stretched measurement from the stretched and make note of this as the stretch factor, which will be abbreviated SF.
Also, at this time, take note of the stretch factor of your fabric. Cut a small sample piece (you can use a piece of a sleeve), measure it laying flat, and make note of this as the non-stretched measurement. Now, stretch it and measure again. You can pin it to an ironing board or foam board to help you with this. Make sure to stretch in the same direction as before. This is the stretched measurement. Subtract the non-stretched measurement from the stretched and make note of this as the stretch factor, which will be abbreviated SF.
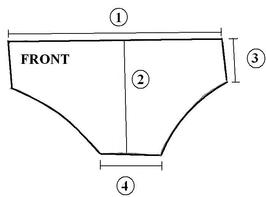
Measure the front as follows:
1. Measure from one side seam of the underwear you are wearing to the other, across the front, at the place where you want your new underwear to lay on you (do you want them to sit at your hips or at your waist?).
2. Measure from the front crotch seam of the underwear you are wearing to where ever you want the new underwear to lay on you (again, hips or waist? Measure to the same point where you took the first measurement.).
3. Decide where you want the underwear to sit. Beginning at the top (again, waist or hips?) and measure down to where you'd like the underwear to hit where your thigh meets your hip. Make sure you get this how you want it because if it's too short, the leg hole may gape open, but if it's too big, it might be uncomfortable.
4. Measure the length of the front crotch seam. You can measure the seam on the underwear you are wearing if they feel comfortable in that area. I've noticed that manufactured underwear often are too small in this area, so you may want to measure yourself, not the underwear.
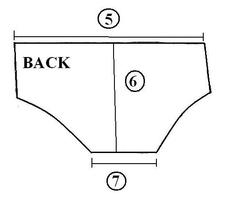
Measure the back as follows:
5. Measure as for #1, but across the back. This measurement WILL be different than #1, and it is supposed to be!
6. Take the measurement as for #2, but from the back crotch seam to where ever you measured #5. Again, this will be different from #2, but it is supposed to be!
7. Measure the length of the back crotch seam. This is difficult to do on your own body without help, so you can measure the underwear you are wearing. If you have trouble with that underwear riding up, add a half inch extra. If it feels too baggy back there, take off a half inch.
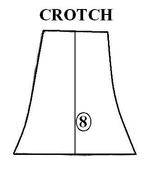
8. This one can be tricky to measure on yourself, so you'll probably have to take the underwear off and measure them. Unless you are wanting a longer lining for some reason, the length of that underwear is probably OK to use.
MAKING THE PATTERN
Now that you have the measurements, you can make the patterns. All seam allowances will be incorporated into the pattern piece measurements, so when cutting them out, cut directly on the line.
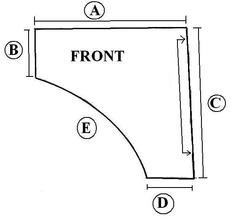
A. Divide measurement #1 in half, add a half inch, then subtract your stretch factor. A = [(#1)/2] + 0.5 - SF
B. Add one inch to measurements #3, then subtract your stretch factor. B = (#3) + 1 - SF
C. Add one inch to measurement #2, then subtract your stretch factor. C = (#2) + 1 - SF
D. Divide measurement #4 in half, add a half inch. D = [(#4)/2] + 0.5
E. This is free-form. You get to decide how the front leg opening is cut. I will say that bigger thighs might be more comfortable against a deeper cut here.
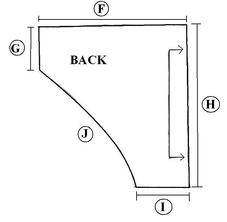
F. Divide measurement #5 in half, add a half inch, and then subtract your stretch factor. F = [(#5)/2] + 0.5 - SF
G. Use measurement B from front piece. G = B
H. Add one inch to measurement #6, then subtract your stretch factor. H = (#6) + 1 - SF
I. Divide measurement #7 in half, add a half inch. I = [(#7)/2] + 0.5
J. As in E from above, you can cut this one however you'd like. The size and shape of your bottom is an important thing to consider. You probably want this a bit more shallow than the front leg opening.
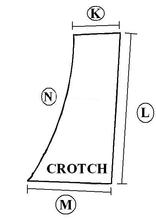
To make the crotch pattern, fold a piece of paper in half. The fold represents L. You want this pattern to be symmetrical, but you will only be cutting out one piece.
K. Use measurement D from above.
L. Add one inch to measurement #8, then subtract your stretch factor. L = (#8) + 1 - SF
M. Use measurement I from above.
N. As in E and J, you can make any shape you'd like here. I'd suggest a shallow, smooth, even curve that doesn't cut inwards narrower than measurement K. But really, it's up to you.
CUTTING THE FABRIC
Fold the T-shirt in half lengthwise, aligning the side seams, as shown in the diagram below. The sleeves may get in the way, so you can cut them off if you want. Place your pattern pieces strategically to avoice stains and seams, if possible. Note that for larger sizes, it may be impossible not to include the side seam in the back piece. If you must use it, center it on the back piece.
A couple of things to consider when placing pattern pieces on the fabric:
1. Is there a design on the shirt you want to keep? If there is a design on the chest, place your front or back piece there, being sure to place the appropriate side on the fold.
2. Do you want to use the bottom hem as the top hem of the underwear? If you want to use it, align side A of the front piece along the front hem of the shirt with side C on the fold; then align side F of the back piece along the back hem of the shirt with side H on the other fold line.
Lay out the crotch piece off the fold, but where you will cut two pieces, unless your shirt is not 100% cotton. If it is not, you only need to cut one crotch piece out of the T-shirt, and then cut another out of some other 100% cotton knit fabric.
PIECING TOGETHER
When piecing, all seams are 1/2 an inch. I used a zigzag stitch for the crotch and side seams, and a simple straight stitch for hemming and sewing in elastic.
It can be difficult to tell the right side from the wrong side of a T-shirt. If you look very, very carefully, you might notice the front side is comprised of smooth stitches, while the back side is comprised of bumps.
It can be difficult to tell the right side from the wrong side of a T-shirt. If you look very, very carefully, you might notice the front side is comprised of smooth stitches, while the back side is comprised of bumps.
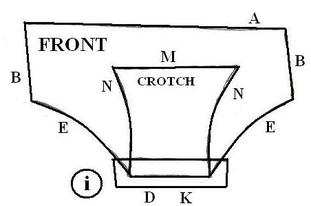
i. Lay the front piece flat, right side up on the table. Then,t ake the two crotch pieces (wrong sides together; lining on top if using a different fabric), and lay them on top of the front piece, aligning the front crotch seam to the front piece crotch edge (D and K), which you will sew first. Pin in place and then stitch the seam (boxed).

ii. Lay the back piece flat, right side up on the table. Then lay the crotch pieces and align the back crotch seam edges (I and M). Pin in place and stitch the seam (boxed).
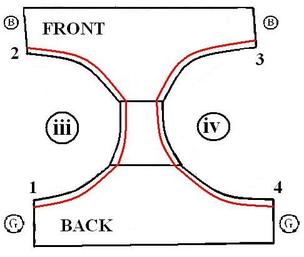
iii. Now you can attach the elastic (red) to the wrong side at the leg openings. Don't cut the elastic, just unroll some because you don't know how much you will need. Stitch from point 1 to point 2, holding the elastic very close to the raw fabric edge, stitching as close to the inner edge of the elastic as possible. Tug gently on the elastic as you feed it through the machine. Begin and end your stitching about a half inch from edges G and B. Trim elastic close to stitching to reduce bulk in side seams.
iv. Repeat (iii) for other leg opening, moving from point 3 to point 4.
v. To cover the elastic, fold the elastic over, encasing it in fabric. Stitch it again, as close to the inner edge as possible, making sure to catch the raw fabric edge over it and stretching it as you go. Do this for both openings.
When attaching elastic to the top hem, you can use a diferent method if you kept the shirt hem.
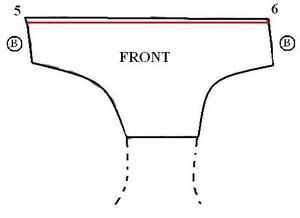
If you DID NOT keep the shirt hem, you should add the elastic as you did for the leg openings. Work from point 5 to point 6, beginning and ending about a half inch from edge B on each end. Trim the elastic close to the stitching, fold it over, and stitch it again.
If you DID keep the shirt hem, you have two options:
* You can thread 1/2" elastic through the hem and call it finished.
* Or, looking at the wrong side of the hem, you probably see a line of machine-serged stitches. It looks like two straight lines with loops in between. You can stitch the elastic down to this line of machine-stitching, again tugging gently as you stitch. Then, take the shirt hem and fold it over the elastic. Sew as close to the edge of the shirt hem as you can. This creates a very cushioned casing for the elastic, but also keeps the elastic in place. It is a bulky seam to sew, but is worth it, I think.
Repeat hemming on the back piece however you did it on the front.
The last step is to seam the sides. Place fabrics wrong side out, pin in place, and stitch a 1/2" seam on each side.
Trim any bulky seams and then you are done!
